2026-06-17
Sanjay Singh
Most people see the finished product. A clean folded garment in a poly bag, ready to go live on a website or hit a store shelf. What they don't see is everything that happened before that moment.
The garment manufacturing process is longer, more detailed, and more collaborative than most first-time brand owners expect. Understanding it doesn't just satisfy curiosity — it makes you a better client. You'll communicate more clearly, set smarter timelines, and avoid costly mistakes.
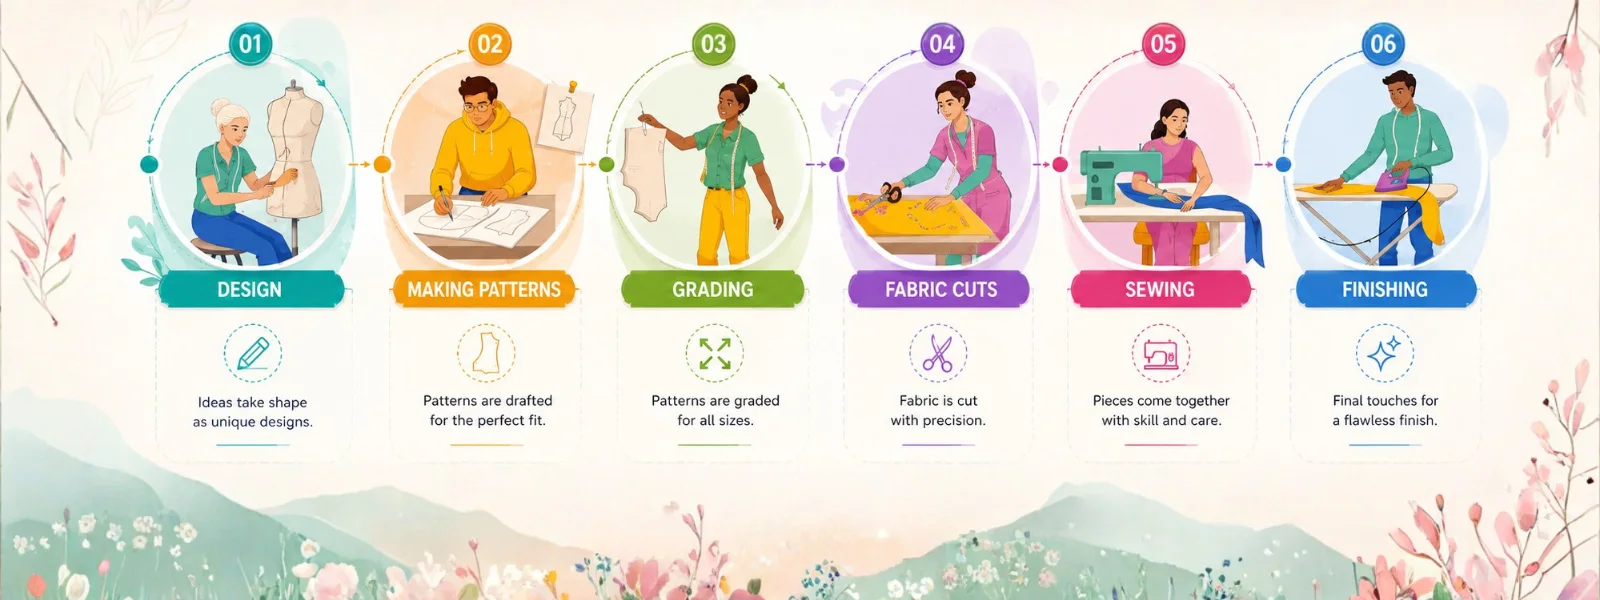
Here's a step-by-step breakdown of exactly how garments go from concept to finished product.
Every garment starts with an idea. A sketch, a reference image, a mood board — something that captures what you're trying to build.
But inspiration alone doesn't get you into production. What manufacturers actually need is a tech pack — a detailed document that spells out everything about the garment. Measurements, construction details, stitching types, fabric specs, colorways, label placement, and finishing instructions. All of it, documented clearly.
Think of a tech pack as your garment's blueprint. A strong one reduces back-and-forth, speeds up sampling, and lowers the chance of getting a prototype that looks nothing like what you imagined.
If you don't have a tech pack, some manufacturers — including Wings2Fashion — will help you develop one from sketches or design references. That's a real advantage for startups who are just getting started.
Once the design is locked, attention shifts to materials.
Fabric selection isn't just about what looks good. It's about what works for the end use. A breathable cotton jersey behaves very differently from a structured woven poly. Weight, stretch, drape, shrinkage — all of these affect how the finished garment fits and wears.
Trims come next: zippers, buttons, elastic, thread, labels, hang tags, interlining. Every small component matters. A garment with premium fabric and cheap hardware signals poor quality immediately.
Experienced manufacturers source fabric directly from verified mills. That direct access keeps costs honest and ensures consistency across repeat orders — something that matters a lot once you're restocking the same product multiple times.
With materials confirmed, pattern makers translate the design into precise cut templates for each size.
Pattern making is technical work. A poorly drafted pattern shows up in the fit immediately — pulling at the shoulders, gaping at the back, bunching at the waist. Getting patterns right takes skill and experience.
After the base pattern is approved, grading extends it across your size range. This isn't just scaling up or down proportionally. Proper grading maintains consistent fit proportions across all sizes, which is harder than it sounds.
This stage is where manufacturing expertise really earns its place. Factories with in-house pattern teams move faster and catch problems earlier than those who outsource this step.
Here's where the product becomes real for the first time.
A sample — sometimes called a prototype or fit sample — is the first physical version of your garment. It's made to test the pattern, the construction, and the overall look before any bulk investment is made.
This is one of the most important stages in the entire process. Don't rush it. Don't skip review.
Examine the sample carefully. Check the fit on a live model or dress form. Look at seam allowances, stitch quality, hem finishing, and how trims are attached. Note every change needed and communicate it precisely.
At Wings2Fashion, fit samples are sent for approval with an estimated turnaround of two to three weeks. Revisions are addressed before anything moves forward. That approval step exists to protect you.
Once revisions are made, a revised sample comes back for final approval. This is your last checkpoint before bulk production begins.
Don't approve a sample you're not happy with. It sounds obvious, but deadline pressure and budget anxiety can push people to say yes when they should say "not yet." Bulk production will replicate whatever you approved — flaws included.
When the sample is approved, production advances are typically required. This is standard practice across the industry and signals that production is ready to begin.
Bulk fabric arrives at the factory and gets inspected first — checking for defects, shade variations, and measurement accuracy.
Then comes cutting. Fabric is laid in multiple layers on long tables. Patterns are placed on top — a process called marker making — to minimize fabric waste. Then industrial cutters slice through the layers simultaneously, producing identical cut pieces across every size in the production run.
Precision here matters. A misaligned cut can throw off an entire batch. Factories with proper cutting infrastructure and experienced operators catch issues before they compound.
Cut pieces move to the sewing floor, where the garment takes shape.
Assembly isn't just one person sewing a garment from start to finish. It's a structured line process. Different operators handle different steps — attaching collars, setting sleeves, sewing side seams, adding pockets, hemming — each specialized in their part of the construction.
This division of labor improves both speed and consistency. It also makes quality monitoring easier. Issues can be caught at specific stations rather than only at the end.
Stitching quality is assessed throughout. Stitch density, seam strength, and thread tension all affect how the garment holds up in wear and wash.
If your garment includes screen printing, digital print, embroidery, patchwork, or other decorative elements, these are typically added at this stage — after base assembly.
Placement accuracy is critical. Off-center prints or uneven embroidery stands out immediately on a finished product and is expensive to fix in bulk.
Wings2Fashion handles custom printing, embroidery, and dyeing in-house, which keeps this stage tightly controlled rather than handed off to a separate vendor.
Before anything gets packaged, it goes through quality inspection.
This means checking every garment — or a statistically significant sample, for large runs — against the approved tech pack and sample. Measurements are verified. Stitching is checked. Fabric defects, print alignment, and trim attachment are all reviewed.
At Wings2Fashion, every garment passes through three to four quality checks before dispatch. That's not a single review at the end — it's staged control across the production process.
Brands also have the option to arrange independent third-party inspection before shipment. For larger orders, this adds a valuable layer of confidence.
Approved garments go through final finishing. This includes thread trimming, ironing or steaming, and any final pressing to ensure the product looks clean and professional.
Then comes labeling. Brand labels, care instruction labels, size tags, hang tags — all are attached according to specifications. For private label orders, this is where your brand identity gets physically built into the product.
Finally, garments are folded, polished, and packed into polybags, boxes, or as specified by the brand. Export packaging is prepared for international shipment.
The finished goods are inspected one final time, then loaded and dispatched.
Shipping timelines depend on destination, method (air vs. sea), and customs clearance. A reliable manufacturer provides tracking and keeps you updated throughout the transit.
At Wings2Fashion, goods are shipped only after the balance payment is received and quality control sign-off is complete. That structure protects both sides of the relationship.
When you know what's happening at every stage, you can plan realistically. You won't expect a finished product two weeks after sharing a sketch. You'll know when to be involved, when to ask questions, and when to trust the process.
More importantly, you'll find it easier to identify a manufacturer who actually follows a proper production flow — versus one who cuts corners and makes up for it with excuses after delivery.
The garment manufacturing process, done right, is methodical and transparent at every stage. That's exactly what Wings2Fashion is built around — clarity from brief to delivery, with quality control running throughout.
If you're ready to start your production journey, get in touch. Share your idea, and the process begins.
Discover expert articles, practical guides, and industry tips to help you stay informed and grow your apparel business with confidence.
Your trusted partner for custom clothing manufacturing, private label apparel, and fashion production. We create high-quality garments that help fashion brands stand out in competitive global markets.
Office Address: Wings2Fashion, SCO -15, Dayal Bagh Colony, Faridabad - 121009, Haryana.
Registered Address: R S Enterprises, (Wings2fashion), C-49, Gali no. 15, Shiv Durga Vihar, Surajkund, Faridabad - 121009, Haryana
Branch Address: SKV Tradex, 1264, Parshu Ram Colony, Tehsil Camp, Panipat - 132103, Haryana.
Copyright © 2014-2026 wings2fashion.com | All rights reserved. | Website Design & Development by DigiLeef
![]()
![]()
Leave A Comment